Oracle Data Transforms -Setup and Configuration
This guide walks through the complete infrastructure and connectivity setup required to extract Fusion ERP data using ODT. It is written for data engineers, analytics engineers, and cloud architects who want a reliable, repeatable extraction foundation.
This document assumes:
Basic familiarity with Oracle Fusion ERP subject areas (helpful but not required)
Access to Oracle Cloud Infrastructure (OCI)
Permission to configure BICC in Fusion ERP
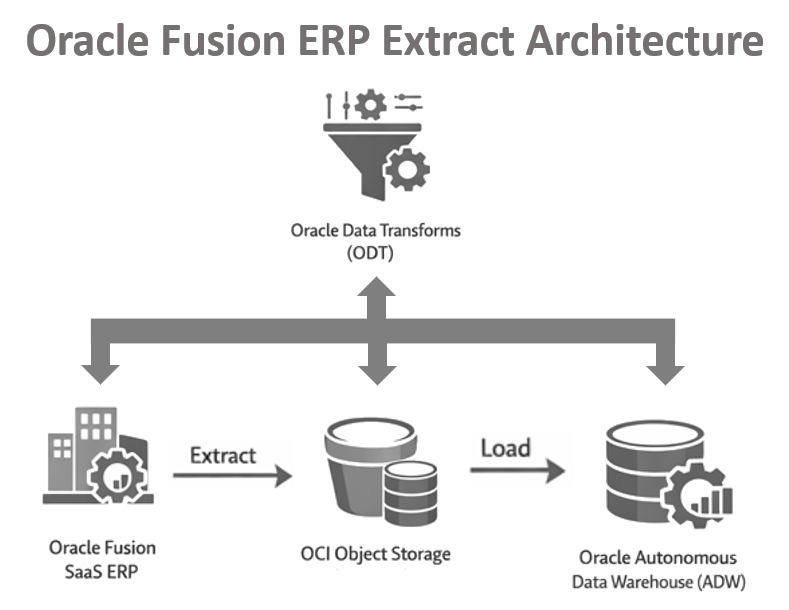
Architecture diagram of Oracle components used to extract data from Oracle Fusion ERP.
Step 1 – Provision Autonomous Data Warehouse (ADW)
1.1 Provision the ADW Instance
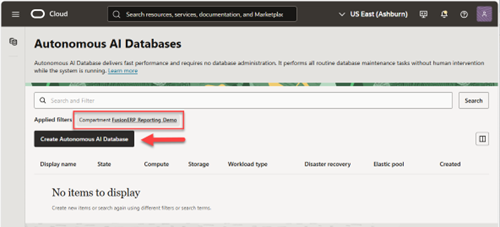
In the OCI Console, navigate to Autonomous Databases
Select the target compartment
Click Create Autonomous Database
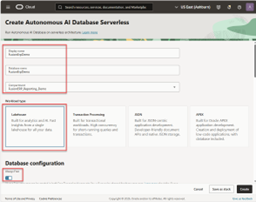
Choose:
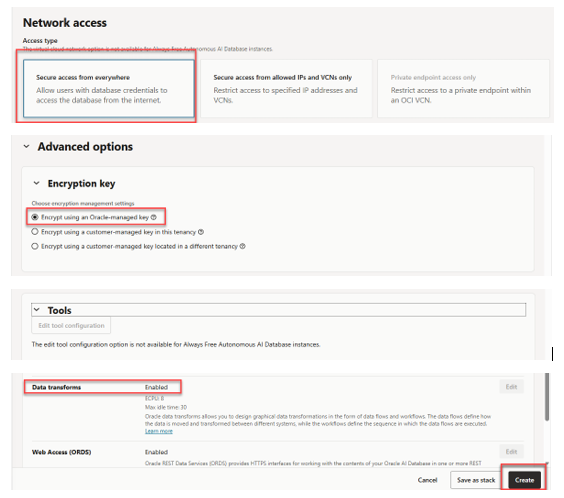
Workload Type: Data Warehouse / Lakehouse
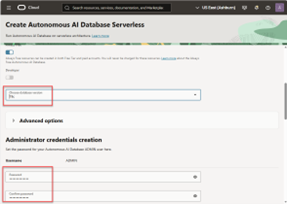
Database Version: 19c
Network Access: Configure per security standards
Ensure Oracle Data Transforms is enabled
Save the Admin password securely
1.2 Connect to ADW Using SQL Developer
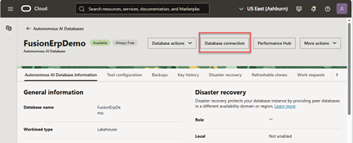
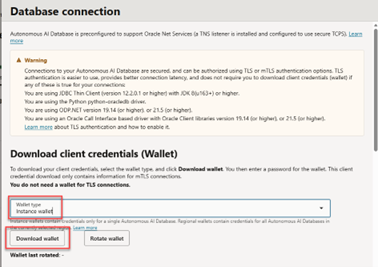
Download the Wallet.zip from the ADW Console
Open SQL Developer
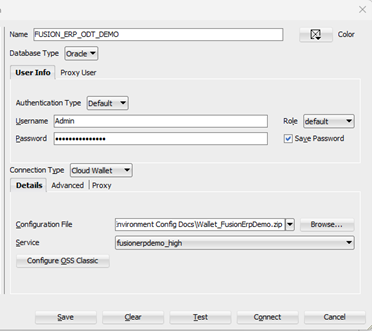
Create a new connection:
Connection Type: Cloud Wallet
Upload Wallet.zip
Authenticate using the Admin credentials
1.3 Create a Dedicated ODT Database User
Important: Do not use the Admin database account for ODT operations.
Execute the following steps in SQL Developer:
Create a dedicated database user
Grant required roles and privileges
Enable network access for BICC
Enable OCI Object Storage PL/SQL access
Best Practice: Keep this script in source control and treat passwords and ACL values as environment‑specific.
-
-- CREATE USER SQL
CREATE USER "XXMIT_FUSION_ERP" IDENTIFIED BY "Your_Tricky_Password"
DEFAULT TABLESPACE "DATA"
TEMPORARY TABLESPACE "TEMP";
-- ALTER USER QUOTA CONFIG
ALTER USER "XXMIT_FUSION_ERP" QUOTA UNLIMITED ON "DATA";
-- GRANT USER ROLES
GRANT "CONNECT" TO "XXMIT_FUSION_ERP" ;
GRANT "RESOURCE" TO "XXMIT_FUSION_ERP" ;
GRANT "ODI_DEVELOPER" TO "XXMIT_FUSION_ERP" ;
GRANT "DWROLE" TO "XXMIT_FUSION_ERP" ;
GRANT "ODIADMIN" TO "XXMIT_FUSION_ERP" ;
GRANT "DATA_TRANSFORM_USER" TO "XXMIT_FUSION_ERP" ;
-----Enable HTTP Requests
set define off;
grant execute on utl_http to XXMIT_FUSION_ERP;
grant execute on dbms_lock to XXMIT_FUSION_ERP;
BEGIN
DBMS_NETWORK_ACL_ADMIN.create_acl (
acl => 'bicc.xml',
description => 'API DEV - ACL functionality',
principal => 'XXMIT_FUSION_ERP',
is_grant => TRUE,
privilege => 'connect',
start_date => SYSTIMESTAMP,
end_date => NULL);
end;
/
BEGIN
DBMS_NETWORK_ACL_ADMIN.ADD_PRIVILEGE (acl => 'bicc.xml'
, principal => 'XXMIT_FUSION_ERP'
, is_grant => TRUE
, privilege => 'resolve');
end;
/
--Privileges below are used to connect to BICC to ResetToFull extracts
--(2)Queries below are used to get the ACL value for the scripts further below. This privilege is used by the DB account to execute HTTP to reset BICC to FULL procedure
SELECT * FROM dba_network_acls;
SELECT * FROM dba_network_acl_privileges;
BEGIN
DBMS_NETWORK_ACL_ADMIN.ADD_PRIVILEGE (
acl => 'NETWORK_ACL_BIGLONGNUMBER_FROM_ABOVE',
principal => 'XXMIT_FUSION_ERP',
is_grant => TRUE,
privilege => 'resolve'
);
END;
/
BEGIN
DBMS_NETWORK_ACL_ADMIN.ADD_PRIVILEGE (
acl => 'NETWORK_ACL_BIGLONGNUMBER_FROM_ABOVE',
principal => 'XXMIT_FUSION_ERP',
is_grant => TRUE,
privilege => 'connect'
);
END;
/
set define off;
begin
DBMS_NETWORK_ACL_ADMIN.assign_acl (
acl => 'bicc.xml',
host => 'fa-ewul-dev3-saasfaprod1.fa.ocs.oraclecloud.com',
lower_port => 1,
upper_port => 50000);
end;
/
commit;
--OCI Object Storge PL/SQL SQK
grant execute on dbms_cloud to XXMIT_FUSION_ERP;
grant execute on DBMS_CLOUD_OCI_OBS_OBJECT_STORAGE to XXMIT_FUSION_ERP;
grant execute on DBMS_CLOUD_OCI_OBS_OBJECT_STORAGE_ABORT_MULTIPART_UPLOAD_RESPONSE_T to XXMIT_FUSION_ERP;
grant execute on DBMS_CLOUD_OCI_OBS_OBJECT_STORAGE_CANCEL_WORK_REQUEST_RESPONSE_T to XXMIT_FUSION_ERP;
grant execute on DBMS_CLOUD_OCI_OBS_OBJECT_STORAGE_COMMIT_MULTIPART_UPLOAD_RESPONSE_T to XXMIT_FUSION_ERP;
grant execute on DBMS_CLOUD_OCI_OBS_OBJECT_STORAGE_COPY_OBJECT_RESPONSE_T to XXMIT_FUSION_ERP;
grant execute on DBMS_CLOUD_OCI_OBS_OBJECT_STORAGE_CREATE_BUCKET_RESPONSE_T to XXMIT_FUSION_ERP;
grant execute on DBMS_CLOUD_OCI_OBS_OBJECT_STORAGE_CREATE_MULTIPART_UPLOAD_RESPONSE_T to XXMIT_FUSION_ERP;
grant execute on DBMS_CLOUD_OCI_OBS_OBJECT_STORAGE_CREATE_PREAUTHENTICATED_REQUEST_RESPONSE_T to XXMIT_FUSION_ERP;
grant execute on DBMS_CLOUD_OCI_OBS_OBJECT_STORAGE_CREATE_REPLICATION_POLICY_RESPONSE_T to XXMIT_FUSION_ERP;
grant execute on DBMS_CLOUD_OCI_OBS_OBJECT_STORAGE_CREATE_RETENTION_RULE_RESPONSE_T to XXMIT_FUSION_ERP;
grant execute on DBMS_CLOUD_OCI_OBS_OBJECT_STORAGE_DELETE_BUCKET_RESPONSE_T to XXMIT_FUSION_ERP;
grant execute on DBMS_CLOUD_OCI_OBS_OBJECT_STORAGE_DELETE_OBJECT_LIFECYCLE_POLICY_RESPONSE_T to XXMIT_FUSION_ERP;
grant execute on DBMS_CLOUD_OCI_OBS_OBJECT_STORAGE_DELETE_OBJECT_RESPONSE_T to XXMIT_FUSION_ERP;
grant execute on DBMS_CLOUD_OCI_OBS_OBJECT_STORAGE_DELETE_PREAUTHENTICATED_REQUEST_RESPONSE_T to XXMIT_FUSION_ERP;
grant execute on DBMS_CLOUD_OCI_OBS_OBJECT_STORAGE_DELETE_REPLICATION_POLICY_RESPONSE_T to XXMIT_FUSION_ERP;
grant execute on DBMS_CLOUD_OCI_OBS_OBJECT_STORAGE_DELETE_RETENTION_RULE_RESPONSE_T to XXMIT_FUSION_ERP;
grant execute on DBMS_CLOUD_OCI_OBS_OBJECT_STORAGE_GET_BUCKET_RESPONSE_T to XXMIT_FUSION_ERP;
grant execute on DBMS_CLOUD_OCI_OBS_OBJECT_STORAGE_GET_NAMESPACE_METADATA_RESPONSE_T to XXMIT_FUSION_ERP;
grant execute on DBMS_CLOUD_OCI_OBS_OBJECT_STORAGE_GET_NAMESPACE_RESPONSE_T to XXMIT_FUSION_ERP;
grant execute on DBMS_CLOUD_OCI_OBS_OBJECT_STORAGE_GET_OBJECT_LIFECYCLE_POLICY_RESPONSE_T to XXMIT_FUSION_ERP;
grant execute on DBMS_CLOUD_OCI_OBS_OBJECT_STORAGE_GET_OBJECT_RESPONSE_T to XXMIT_FUSION_ERP;
grant execute on DBMS_CLOUD_OCI_OBS_OBJECT_STORAGE_GET_PREAUTHENTICATED_REQUEST_RESPONSE_T to XXMIT_FUSION_ERP;
grant execute on DBMS_CLOUD_OCI_OBS_OBJECT_STORAGE_GET_REPLICATION_POLICY_RESPONSE_T to XXMIT_FUSION_ERP;
grant execute on DBMS_CLOUD_OCI_OBS_OBJECT_STORAGE_GET_RETENTION_RULE_RESPONSE_T to XXMIT_FUSION_ERP;
grant execute on DBMS_CLOUD_OCI_OBS_OBJECT_STORAGE_GET_WORK_REQUEST_RESPONSE_T to XXMIT_FUSION_ERP;
grant execute on DBMS_CLOUD_OCI_OBS_OBJECT_STORAGE_HEAD_BUCKET_RESPONSE_T to XXMIT_FUSION_ERP;
grant execute on DBMS_CLOUD_OCI_OBS_OBJECT_STORAGE_HEAD_OBJECT_RESPONSE_T to XXMIT_FUSION_ERP;
grant execute on DBMS_CLOUD_OCI_OBS_OBJECT_STORAGE_LIST_BUCKETS_RESPONSE_T to XXMIT_FUSION_ERP;
grant execute on DBMS_CLOUD_OCI_OBS_OBJECT_STORAGE_LIST_MULTIPART_UPLOADS_RESPONSE_T to XXMIT_FUSION_ERP;
grant execute on DBMS_CLOUD_OCI_OBS_OBJECT_STORAGE_LIST_MULTIPART_UPLOAD_PARTS_RESPONSE_T to XXMIT_FUSION_ERP;
grant execute on DBMS_CLOUD_OCI_OBS_OBJECT_STORAGE_LIST_OBJECTS_RESPONSE_T to XXMIT_FUSION_ERP;
grant execute on DBMS_CLOUD_OCI_OBS_OBJECT_STORAGE_LIST_OBJECT_VERSIONS_RESPONSE_T to XXMIT_FUSION_ERP;
grant execute on DBMS_CLOUD_OCI_OBS_OBJECT_STORAGE_LIST_PREAUTHENTICATED_REQUESTS_RESPONSE_T to XXMIT_FUSION_ERP;
grant execute on DBMS_CLOUD_OCI_OBS_OBJECT_STORAGE_LIST_REPLICATION_POLICIES_RESPONSE_T to XXMIT_FUSION_ERP;
grant execute on DBMS_CLOUD_OCI_OBS_OBJECT_STORAGE_LIST_REPLICATION_SOURCES_RESPONSE_T to XXMIT_FUSION_ERP;
grant execute on DBMS_CLOUD_OCI_OBS_OBJECT_STORAGE_LIST_RETENTION_RULES_RESPONSE_T to XXMIT_FUSION_ERP;
grant execute on DBMS_CLOUD_OCI_OBS_OBJECT_STORAGE_LIST_WORK_REQUESTS_RESPONSE_T to XXMIT_FUSION_ERP;
grant execute on DBMS_CLOUD_OCI_OBS_OBJECT_STORAGE_LIST_WORK_REQUEST_ERRORS_RESPONSE_T to XXMIT_FUSION_ERP;
grant execute on DBMS_CLOUD_OCI_OBS_OBJECT_STORAGE_LIST_WORK_REQUEST_LOGS_RESPONSE_T to XXMIT_FUSION_ERP;
grant execute on DBMS_CLOUD_OCI_OBS_OBJECT_STORAGE_MAKE_BUCKET_WRITABLE_RESPONSE_T to XXMIT_FUSION_ERP;
grant execute on DBMS_CLOUD_OCI_OBS_OBJECT_STORAGE_PUT_OBJECT_LIFECYCLE_POLICY_RESPONSE_T to XXMIT_FUSION_ERP;
grant execute on DBMS_CLOUD_OCI_OBS_OBJECT_STORAGE_PUT_OBJECT_RESPONSE_T to XXMIT_FUSION_ERP;
grant execute on DBMS_CLOUD_OCI_OBS_OBJECT_STORAGE_REENCRYPT_BUCKET_RESPONSE_T to XXMIT_FUSION_ERP;
grant execute on DBMS_CLOUD_OCI_OBS_OBJECT_STORAGE_REENCRYPT_OBJECT_RESPONSE_T to XXMIT_FUSION_ERP;
grant execute on DBMS_CLOUD_OCI_OBS_OBJECT_STORAGE_RENAME_OBJECT_RESPONSE_T to XXMIT_FUSION_ERP;
grant execute on DBMS_CLOUD_OCI_OBS_OBJECT_STORAGE_RESTORE_OBJECTS_RESPONSE_T to XXMIT_FUSION_ERP;
grant execute on DBMS_CLOUD_OCI_OBS_OBJECT_STORAGE_UPDATE_BUCKET_RESPONSE_T to XXMIT_FUSION_ERP;
grant execute on DBMS_CLOUD_OCI_OBS_OBJECT_STORAGE_UPDATE_NAMESPACE_METADATA_RESPONSE_T to XXMIT_FUSION_ERP;
grant execute on DBMS_CLOUD_OCI_OBS_OBJECT_STORAGE_UPDATE_OBJECT_STORAGE_TIER_RESPONSE_T to XXMIT_FUSION_ERP;
grant execute on DBMS_CLOUD_OCI_OBS_OBJECT_STORAGE_UPDATE_RETENTION_RULE_RESPONSE_T to XXMIT_FUSION_ERP;
grant execute on DBMS_CLOUD_OCI_OBS_OBJECT_STORAGE_UPLOAD_PART_RESPONSE_T to XXMIT_FUSION_ERP;
grant READ,WRITE ON directory DATA_PUMP_DIR TO XXMIT_FUSION_ERP;
Step 2 – OCI Object Storage
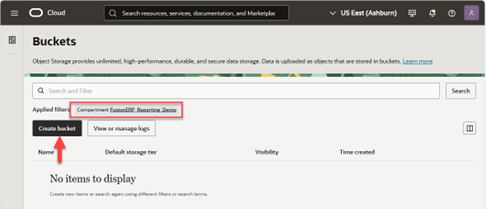
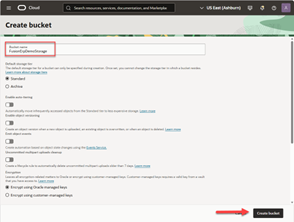
Create an OCI Object Storage bucket
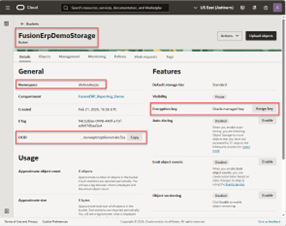
Record the following values:
Bucket Name
Namespace
Bucket OCID
Region
These values are used later for BICC and ODT configuration.
Step 3 - Fusion ERP BICC Configuration
3.1 Configure External Storage
Log into Fusion ERP
Navigate to BI Cloud Connector Console
https://<fusion_url>/BIACMSelect Configure External Storage
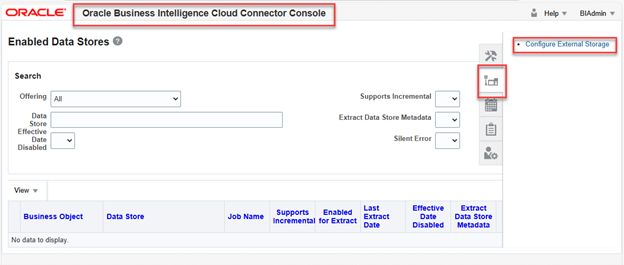
4. Choose OCI Object Storage Connection

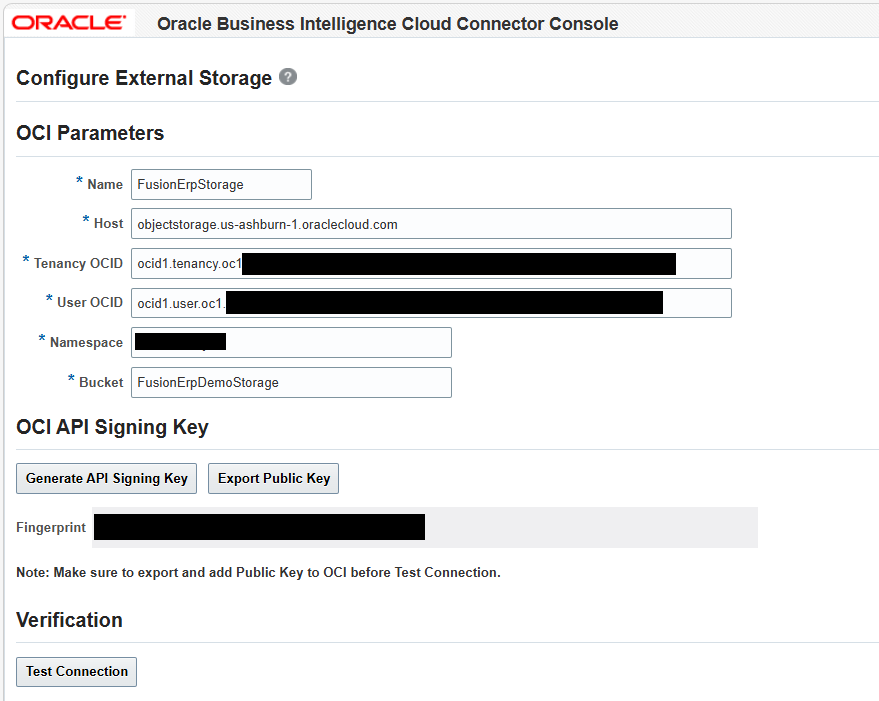
Completed Setup
5. Enter Setup values:
Name: YOURSTORAGENAME
Host: objectstorage.<OCI Region>.oraclecloud.com (example: objectstorage.us-ashburn-1.oraclecloud.com)
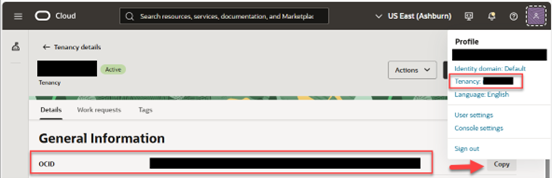
Tenancy OCID - From User Profile -> Tenancy link (see below)
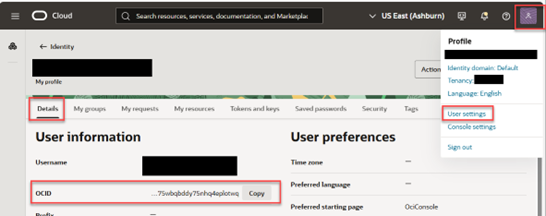
User OCID - From User Profile (see below)
Bucket Name – Saved from earlier configuration
Namespace – Saved from earlier configuration
Region – OCI Region
3.2 Configure API Key Authentication
Export the public key from BICC
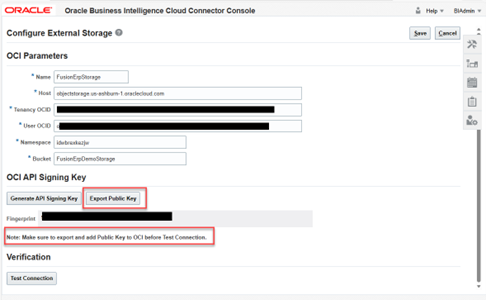
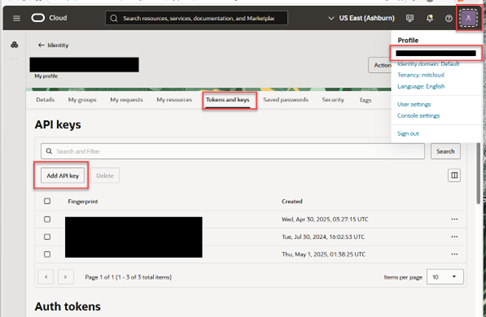
2. In OCI Console:
Navigate to the OCI User
Upload the public key under API Keys
Select the .pem file and click “Add”
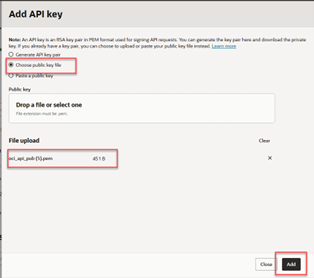
This establishes secure authentication between Fusion ERP and OCI Object Storage.
Below is a link to a great Oracle A-Team video on the BICC Connection setup (watch the initial 8 minutes only)
OCI Data Integration - Extract data from Fusion Apps
Step 4 – Oracle Data Transforms (ODT)
4.1 Access Oracle Data Transforms
In OCI, open your ADW instance
Navigate to Tool Configuration → Data Transforms
Copy and open the public access URL
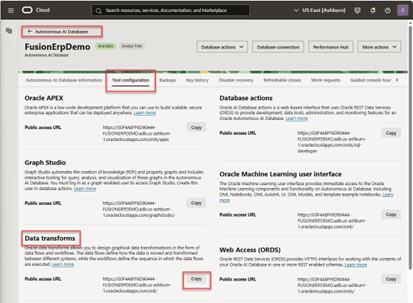
4.2 Configure ADW Connection
Create a new Database Connection
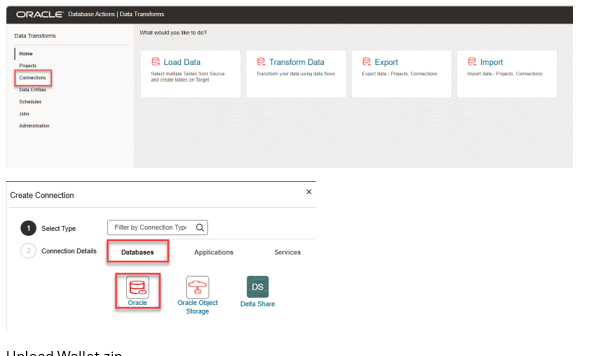
Upload Wallet.zip
Select service name
Enter the dedicated ODT database user credentials
Test and save the connection
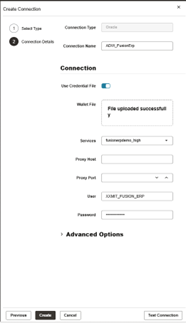
4.3 Configure Fusion BICC Connection
Important: This configuration must be completed in a single session.
Create a new Application Connection
Select Oracle BI Cloud Connector
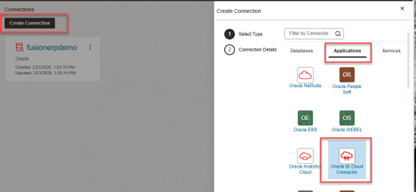
Provide:
Fusion ERP base URL (ending in .com/)
External Storage Name
Bucket Name
Namespace
OCI Region
OCI User
OCI Auth Token
Test and save the connection
5. Enter the configuration details shown below:
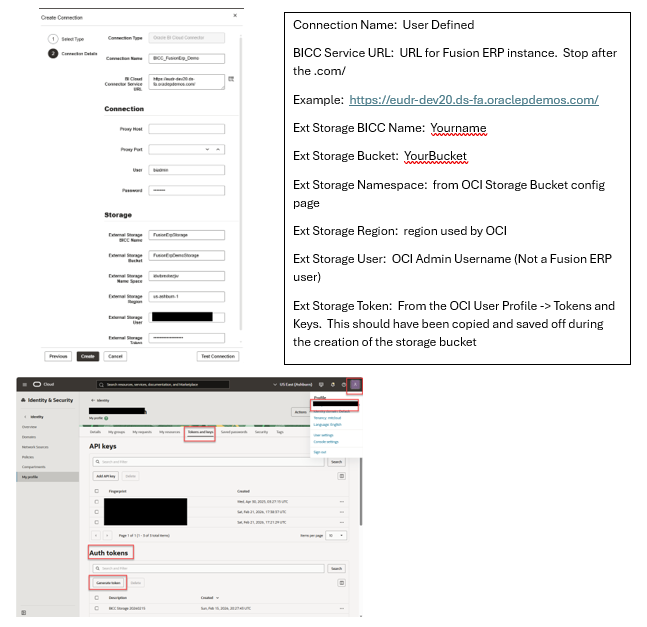
At this point, all required infrastructure and connectivity setups are complete.
What’s Next?
With infrastructure configured, you are ready to:
Create your first Oracle Data Transforms project
Select Fusion View Objects for extraction
Run initial extracts
Validate data in ADW
Schedule and monitor pipelines
Summary
You have completed the most complex portion of the Fusion ERP → ODT → OCI → ADW architecture. With secure connections, proper roles, and a scalable foundation in place, building and operating ERP extraction pipelines becomes significantly simpler and more reliable.